
We will show you four ways to tie a tie.
If you are not familiar with tying a tie, choose a smaller, simpler way to tie a tie knot, such as a "four-handed" or "half Windsor" knot. If you prefer a larger, more triangular knot, the "full Windsor" may be the knot for you. It is recommended to know more than one way to tie your tie so that you can match the correct knot to your tie and shirt collar.
Now for detailed instructions on each tie knot.
Four in Hand Knot
1.Lift up the collar of your shirt and tie the tie around your neck. Make sure the wider end of the tie hangs farther back than the narrow end of the tie. This is important because you will only use the wider end of the tie to tie a four-handed knot.
2.The wider end of the tie goes through the narrower end. Wrap the wider part of the tie behind the narrow end. Then, wrap the wider part of the tie around the narrow end of the tie.
3.Then, pull the wider end of the tie over the part of the tie that comes out of the collar as shown in Figures 3 and 4. Do not tighten the completed four-handed half of the knot too much. Instead, tie a loop in the front of the tie knot.
4.Pull the wider part of the tie through the loop. Make sure the wider part of the tie is centered over the four-hand knot before tying the tie tightly.
5.This will ensure that the narrow part of the tie is hidden behind the four hand knots.
Kent Knot
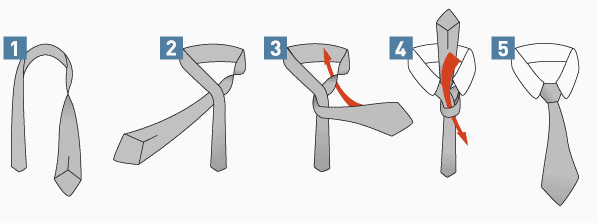
1.Turn over the collar of your shirt and tie the tie around your neck. Make sure to twist the wide end once to show the back of the tie.
2.Place the wide end on the back of the narrow side of the tie.
3.Then, wrap the wide end around the narrow part of the tie. The front of the wide end of the tie must be exposed. Use one hand to create a loop while slightly tightening the unfinished tie knot. Wrap the wider part of the tie around the other end of the collar.
4.Then, pull the wide end of the tie through the loop. Before tightening any tie knots, make sure the wide edge of the tie is in the center of the knot. This will ensure that the narrow edge of the tie does not show through.
5.Flip the collar of the shirt and adjust the tie knot to complete the final result.
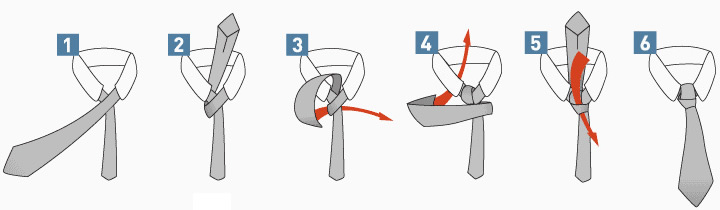
Half Windsor Knot

1.Turn up the collar and tie the tie around your neck. Place the wider end of the tie on the narrower side and press down with one finger. Make sure to leave extra length on the wide side to tie the half Windsor tie knot.
2.Wrap the wide end of the tie around the tie part on the other side of the tie.
3.Wrap the tie behind the narrow side and loop back. Tighten the half-finished knot slightly and secure it in place with one finger.
Wrap the wide side of the tie around the narrow end of the tie. This time, do not tighten it, but make a loop in front of the knot. Use one finger to keep the loop open while using the same hand to secure the eh knot in place. Then, wrap the narrow end of the tie around the part from the collar - just as you did in #2.
4.Pull the wide end of the tie through the loop.
5. Slowly tighten the half Windsor knot, turning your collar down and finally centering it between the collars. You've finished the half Windsor knot!
Double Windsor Knot
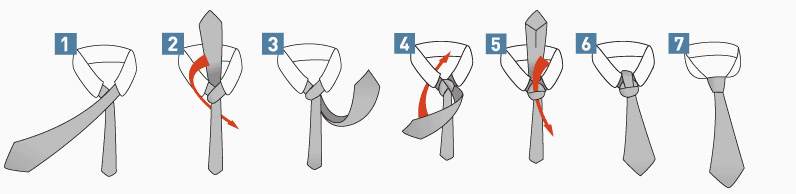
1.To tie a Windsor knot, first lift up your collar and tie the tie around your neck. The double Windsor knot is a larger tie knot, which requires more tie length. For this reason, be sure to let the wide part of the tie hang much lower than the narrow end.
2.Place the wide end of the tie over the narrow end and pull it back and then back to the part of the tie that comes out of the neckline. Then pull the wide part of the tie back behind the narrow end, as shown by the red arrow in Figure 2. Tip: Hold the narrow end slightly with one hand. This will help you keep the half-finished tie knot in place and slightly tightened.
3.Now do the same thing on the other side of the tie. This will create the popular symmetrical look of a double Windsor knot.
Now pull the wide end of the tie over the narrow end and form a loop. Use one hand to open the top while holding the half-finished double Windsor knot in place.
4.Pull the wide end of the tie through the loop.
5.Tighten the double Windsor knot and turn down the collar, adjusting the double Windsor knot so that the knot is centered between the collars.